Exchange Online Migration Step-by-Step Guide
A practical Exchange Online migration guide covering mailbox inventory, identity, licensing, DNS, mail flow, pilot batches, cutover, validation, and post-migration support.
- Published
- Reading time
- 6 min read
Before you start
Is this guide for you?
- Best entry point
- Migration
- Time investment
- 6 min read
In this article
- What is Exchange Online migration?
- Step 1: Define migration scope
- Step 2: Inventory the source email system
- Step 3: Choose the migration approach
- Step 4: Prepare the Microsoft 365 tenant
On this page (15 sections)
Exchange Online migration is the process of moving business email into Microsoft 365. The source might be Exchange Server, Google Workspace, IMAP mailboxes, another Microsoft 365 tenant, or a hosted email platform.
A good email migration is not just copying mailbox data. It includes identity, licensing, mail flow, DNS, security, compliance, device access, user communication, and support readiness. If any of those areas are missed, users may see missing mail, broken Outlook profiles, failed delivery, or confusion after go-live.
This guide is written for Microsoft 365 administrators, consultants, IT support teams, and business owners planning an Exchange Online migration. For broader planning, also read What Is Microsoft 365 Migration? and the Microsoft 365 Migration Checklist for Beginners.
What is Exchange Online migration?
Exchange Online migration moves email workloads into Microsoft 365. Depending on the source and project scope, the migration can include:
- User mailboxes
- Shared mailboxes and resource mailboxes
- Calendars, contacts, and mailbox folders
- Archive mailboxes and retention requirements
- Distribution groups and mail-enabled security groups
- Delegates, Send As, Send on behalf, and Full Access permissions
- Mail flow rules, accepted domains, connectors, and DNS records
Step 1: Define migration scope
Start by deciding exactly what is moving and when. Some projects move only mailboxes. Others include archives, shared mailboxes, distribution groups, public folders, transport rules, compliance settings, and third-party security services.
- In scope: active user mailboxes, shared mailboxes, calendars, contacts, distribution groups, and required archives.
- Out of scope: inactive mailboxes, old test accounts, abandoned shared mailboxes, obsolete groups, and data that should be retained elsewhere.
- Later phase: public folders, complex journaling, application relay, third-party archive data, or tenant-to-tenant coexistence.
Step 2: Inventory the source email system
Inventory tells you how much data is moving and where migration risk exists. Do not rely only on total mailbox count.
Capture these details:
- Mailbox count, mailbox size, archive size, and inactive users
- Shared mailboxes, room mailboxes, equipment mailboxes, and delegates
- Distribution groups, dynamic groups, mail contacts, and aliases
- Mailbox permissions and Send As or Send on behalf access
- Current MX, SPF, DKIM, DMARC, Autodiscover, and relay configuration
- Transport rules, connectors, journaling, signatures, and disclaimers
- Compliance requirements, retention, legal hold, and eDiscovery needs
Step 3: Choose the migration approach
The right approach depends on the source platform, mailbox count, timeline, coexistence needs, and business risk.
- Cutover migration: useful for smaller environments where all mailboxes move in one event.
- Staged or batch migration: useful when users move in controlled waves.
- Hybrid migration: useful for Exchange Server environments that need coexistence and gradual mailbox movement.
- IMAP migration: useful for basic mailbox content from systems that support IMAP, but it has limitations for calendars, contacts, and permissions.
- Third-party migration tools: useful for Google Workspace, tenant-to-tenant moves, archives, complex reporting, and advanced scheduling.
Step 4: Prepare the Microsoft 365 tenant
The destination tenant must be ready before migration begins. Tenant preparation prevents avoidable failures during pilot and cutover.
- Verify the domain in Microsoft 365.
- Create or sync users through Microsoft Entra ID.
- Assign the correct Exchange Online or Microsoft 365 licenses.
- Confirm administrator roles in the Microsoft 365 admin center and Exchange admin center.
- Prepare shared mailboxes, groups, aliases, and accepted domains.
- Review security defaults, Conditional Access, MFA, and authentication methods.
For admin role planning, see Microsoft 365 Admin Roles Explained.
Step 5: Plan DNS and mail flow
Email migration depends heavily on DNS and routing. Plan changes carefully and avoid changing MX records before the destination is ready.
- MX: controls where new inbound mail is delivered.
- SPF: authorizes systems that can send email for the domain.
- DKIM: signs outbound messages to improve trust.
- DMARC: defines reporting and policy for failed authentication.
- Autodiscover: helps Outlook find mailbox settings.
Also review connectors, relay devices, scanners, CRM systems, printers, websites, and applications that send email through the current environment.
Step 6: Prepare users and communication
Email migration affects daily work. Users need simple, timely communication before anything changes.
- Explain the migration date and expected impact.
- Tell users whether Outlook needs to be restarted or reconfigured.
- Share guidance for Outlook on the web and mobile devices.
- Prepare support contacts and escalation paths.
- Warn users about temporary sync delays or known limitations.
Step 7: Run a pilot migration
Choose a small group of real users for the pilot. Include different mailbox sizes, departments, device types, and delegate scenarios. A pilot should test the real process, not only a small test mailbox.
Validate these items during the pilot:
- Mailbox data migrated correctly.
- Outlook and Outlook on the web work after migration.
- Mobile devices can connect.
- Calendars, contacts, and recent mail are available.
- Shared mailbox and delegate access work as expected.
- Mail can be sent and received internally and externally.
Step 8: Migrate in production waves
For medium and large environments, migrate in waves. Waves reduce support pressure and make it easier to fix issues before the next group moves.
- Group users by department, region, mailbox size, or business priority.
- Avoid moving too many VIP or high-dependency users in the first wave.
- Schedule migrations around business hours and regional time zones.
- Track batch status, failed items, skipped items, and user sign-off.
- Keep rollback or support procedures ready for critical users.
Step 9: Cut over mail flow
Cutover is the point where new mail starts routing to Exchange Online. Change DNS and routing only after pilot results are acceptable and the support team is ready.
- Lower DNS TTL before cutover if your DNS provider supports it.
- Update MX records when the destination is ready to receive mail.
- Update SPF, DKIM, and DMARC for Microsoft 365 sending.
- Confirm mail flow connectors and relay scenarios.
- Test inbound, outbound, internal, and external delivery.
Step 10: Validate after migration
Validation should include both technical checks and user checks. Migration reports are useful, but business users must confirm they can work.
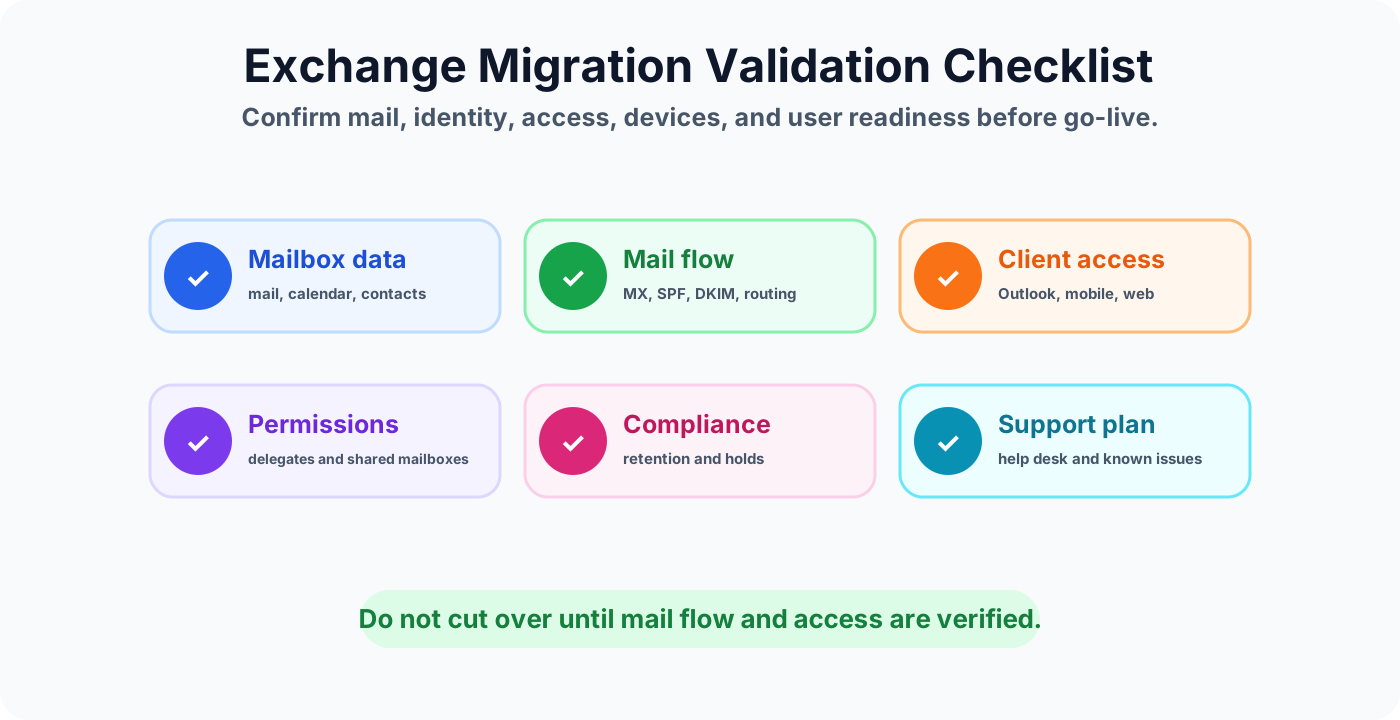
- Confirm mailbox item counts and recent mail.
- Check calendar, contacts, folders, archives, and search.
- Test Outlook desktop, Outlook on the web, and mobile access.
- Validate shared mailbox access and delegate permissions.
- Test distribution groups, aliases, and mail contacts.
- Confirm send and receive tests for internal and external mail.
- Review quarantine, spam filtering, mail flow rules, and connectors.
- Confirm retention, holds, audit, and compliance settings.
Step 11: Support users after go-live
The first few days after migration are important. Prepare the help desk with known issues, scripts, escalation contacts, and clear troubleshooting steps.
- Help users recreate or reconnect Outlook profiles if needed.
- Support mobile device reconfiguration.
- Resolve missing delegate or shared mailbox access.
- Track mail delivery issues and DNS propagation delays.
- Monitor service health in the Microsoft 365 admin center.
Common Exchange Online migration mistakes
- Changing MX records before the destination is fully ready.
- Skipping mailbox inventory and discovering large mailboxes too late.
- Forgetting shared mailboxes, aliases, delegates, and room mailboxes.
- Not testing Outlook, mobile, and web access before production waves.
- Ignoring third-party email security, signatures, scanners, or relay systems.
- Moving users without clear communication and support coverage.
Exchange Online migration checklist
- Migration scope approved
- Mailbox and group inventory completed
- Source platform and migration approach confirmed
- Microsoft 365 tenant prepared
- Users created or synced
- Licenses assigned
- DNS and mail flow plan reviewed
- Pilot migration completed
- Production waves scheduled
- User communication sent
- Cutover plan approved
- Post-migration validation completed
- Help desk and escalation plan ready
The bottom line
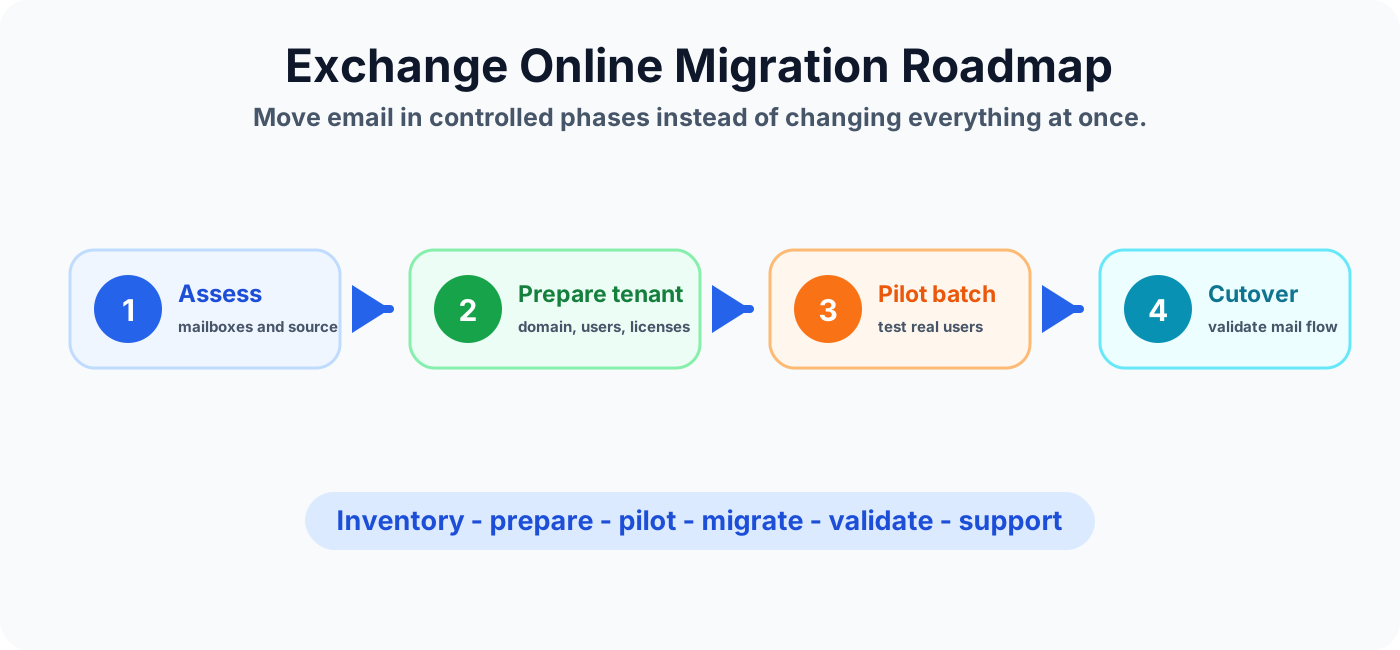
An Exchange Online migration succeeds when it is planned as an email, identity, DNS, security, and user readiness project. Start with inventory, prepare the tenant, test with a pilot, migrate in waves, validate mail flow, and support users after cutover.
Do not treat email migration as only data movement. Mail flow, access, and user confidence matter just as much as mailbox copy status.
NEXT STEP
Plan the Whole Move, Not Just the Mailboxes
Use an assessment to map mail, content, identity, and coexistence dependencies before committing to migration waves.
30-minute technical discussion • No obligation • Practical next steps
Tagged
Governance · Security · Permissions · Admin Center
Frequently asked questions
What is Exchange Online migration?
Exchange Online migration is the process of moving mailboxes, calendars, contacts, archives, mail flow, and email access from an existing mail platform into Microsoft 365 Exchange Online.
What should I check before an Exchange Online migration?
Check mailbox size, source platform, user accounts, licenses, domains, DNS, mail flow, shared mailboxes, distribution groups, delegates, archives, retention, security, and client access requirements.
Should I run a pilot before migrating all mailboxes?
Yes. A pilot with real users helps validate mailbox migration, Outlook access, mobile access, mail flow, permissions, and support procedures before production waves.
What records are important for Exchange Online mail flow?
Important records include MX for delivery, SPF for sender validation, DKIM for signing, DMARC for policy reporting, and Autodiscover for Outlook configuration.
How do I validate an Exchange Online migration?
Validate mailbox item counts, recent mail, calendar, contacts, delegates, shared mailboxes, send and receive tests, Outlook profiles, mobile access, mail flow rules, compliance settings, and user sign-off.
Sources
- Microsoft Learn: Exchange Online, Microsoft
- Microsoft Learn: Exchange, Microsoft
Have a Microsoft 365 topic idea?
Share article suggestions, community session ideas, corrections, or real-world scenarios for future nextM365 learning notes.
Keep learning Microsoft 365
Explore more practical guides for SharePoint, Power Platform, Copilot Studio, migration, automation, governance, and security.
Continue learning
Related tutorials
Related questions
Related comparisons
Next action