Condition Node Explained | Copilot Studio Day 17
Learn what a Condition node is in Microsoft Copilot Studio, how TRUE and FALSE paths work, supported conditions, best practices, and a leave approval example.
- Published
- Reading time
- 5 min read
Week 3 · Day 17 of 365 in 365 Days of Copilot Studio — view the full series
What you’ll learn
- What is a Condition node?
- Why use Condition nodes?
- Supported condition types
- How a Condition node works
- Real example: leave approval scenario
On this page (11 sections)
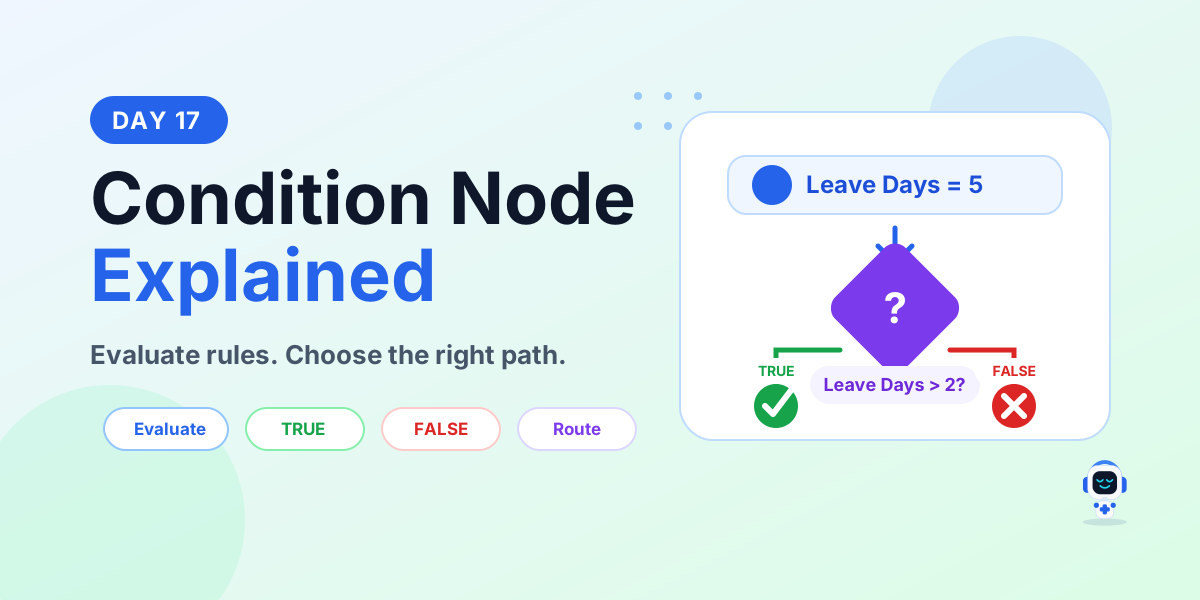
A Condition node in Microsoft Copilot Studio evaluates a rule and decides what happens next in the conversation. It helps your agent compare values, check user input, apply business logic, and route the user down the right path.
Day 17 of the 365 Days of Microsoft Copilot Studio series explains Condition nodes in beginner-friendly terms: what they are, why they matter, supported condition types, how TRUE and FALSE paths work, and how to use them in a real leave approval scenario.
What is a Condition node?
A Condition node is a decision step. It checks whether a rule is true or false, then sends the conversation to the matching path.
For example, if a user enters 5 leave days, the topic can check LeaveDays > 2. If the condition is true, the topic can route the request to manager approval. If the condition is false, it can use auto approval.
In simple words: Condition node = decision maker.
Why use Condition nodes?
Condition nodes make Copilot Studio conversations smarter because the agent can respond differently based on data, context, and business rules.
- Personalize conversations: show the right information to the right user.
- Make smart decisions: evaluate rules and guide the conversation to the correct path.
- Automate business rules: apply conditions for approvals, validations, routing, and process decisions.
- Reduce manual steps: handle complex scenarios automatically and save time.
- Improve accuracy and efficiency: make consistent decisions and reduce avoidable mistakes.
Supported condition types
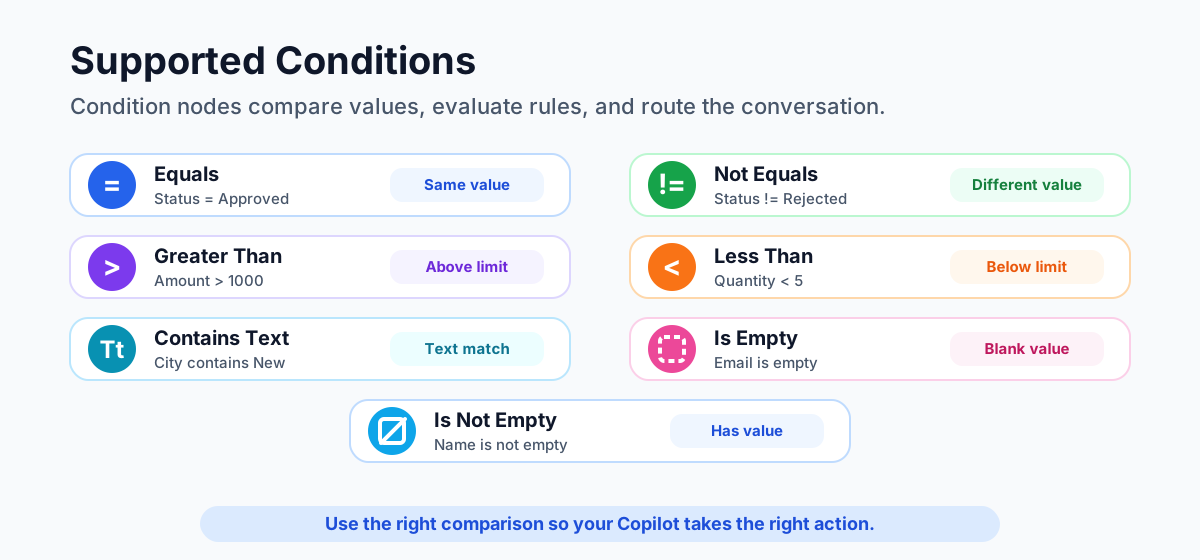
Condition nodes support common comparisons that help you evaluate data accurately. The exact options you use depend on the value type and the conversation design.
- Equals: checks if two values are the same, such as Status = Approved.
- Not equals: checks if two values are different, such as Status != Rejected.
- Greater than: checks if a number is higher than another value, such as Amount > 1000.
- Less than: checks if a number is lower than another value, such as Quantity < 5.
- Contains text: checks if a text value contains a word or phrase, such as City contains New.
- Is empty: checks whether a value is blank, such as Email is empty.
- Is not empty: checks whether a value exists, such as Name is not empty.
How a Condition node works
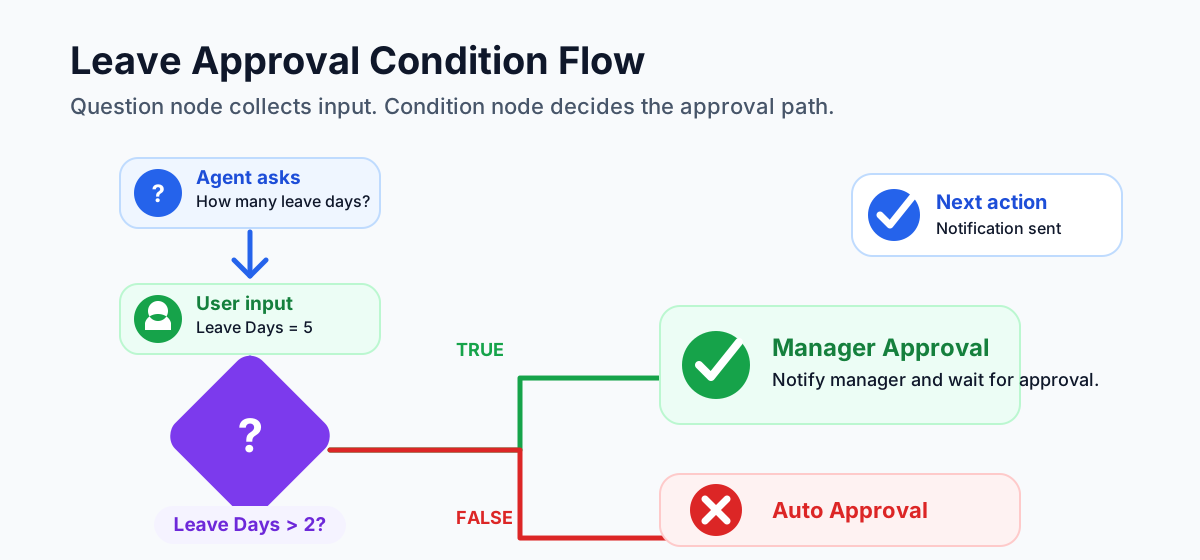
A Condition node usually follows a Question node or another step that creates data for the topic to evaluate.
- Agent asks. The agent asks a question to collect user input.
- User responds. The user provides the requested value.
- Condition evaluates. The Condition node checks the rule or comparison.
- If TRUE. The topic follows the TRUE path.
- If FALSE. The topic follows the FALSE path.
- Next action. The agent continues with the next step, message, action, or flow.
Real example: leave approval scenario
Imagine an employee is requesting leave. The business rule is simple: if leave days are more than 2, manager approval is required. Otherwise, the request can be auto approved.
- Agent asks: How many leave days are you requesting?
- User input: the user enters 5 leave days.
- Condition node: checks if LeaveDays > 2.
- If TRUE: go to the manager approval flow.
- If FALSE: go to the auto approval flow.
- Next action: send the notification to the employee.
This pattern is useful because the same agent can handle different user scenarios without forcing every user through the same process.
Condition node vs Question node
Question nodes and Condition nodes work together, but they do different jobs.
- Question node: collects information from the user and stores the response in a variable.
- Condition node: evaluates that variable or another value and decides the next path.
A common pattern is: ask first, decide next, then act. The Question node collects input, the Condition node checks the input, and the topic runs the right message, action, or flow.
Common use cases
Condition nodes are useful anywhere the agent needs to make a decision:
- HR leave approval: check leave days, balance, or leave type to decide the approval path.
- Expense claims: validate claim amount and category to route to the right approver.
- Order processing: check stock availability, payment status, or order value.
- IT ticket routing: route tickets based on priority, category, or user role.
- Inventory checks: check quantity levels and create reorder requests when stock is low.
- Customer support: personalize responses based on user type, issue type, or status.
Best practices for Condition nodes
Good conditions are simple, readable, and easy to test. Follow these practices when building topics:
- Keep conditions simple. Use clear rules and avoid overly complex logic.
- Use clear variable names. Meaningful names like LeaveDays, ClaimAmount, or UserType make logic easier to maintain.
- Avoid deep nesting. Too many nested conditions make the flow hard to follow. Break complex logic into smaller steps.
- Test every path. Always test TRUE and FALSE paths to confirm the topic behaves correctly.
- Add a default path. Include a fallback path for missing, unexpected, or unclear values.
- Document your logic. Add comments or notes for complex business rules so future makers can understand the design.
Common mistakes to avoid
- Do not use too many nested conditions in one topic.
- Do not compare different data types, such as text against a number, without preparing the value first.
- Do not leave any path unhandled.
- Do not ignore edge cases and exceptions.
- Do not skip testing with realistic user inputs.
Beginner checklist
- Identify the business rule before adding the Condition node.
- Confirm which variable or value the condition should check.
- Choose the correct comparison type.
- Create clear TRUE and FALSE paths.
- Add a fallback path for unexpected input.
- Test every path with realistic examples.
Key takeaways
- Condition nodes make decisions. They evaluate data and guide the conversation flow.
- Simple conditions are easier to manage. Clear variable names and simple rules improve reliability.
- Plan for all outcomes. Handle TRUE, FALSE, and unexpected cases.
- Test and optimize. Testing every path helps prevent broken conversations.
- Better decisions create better experiences. A well-designed Condition node helps your Copilot respond at the right time with the right action.
Use Condition nodes wisely, structure them clearly, and your Copilot will take the right path more consistently.
Next in the series: Day 18.
Related resources
Topics covered
Topics · Conversation Design · Variables · AI Agents
Frequently asked questions
What is a Condition node in Microsoft Copilot Studio?
A Condition node evaluates a rule or comparison and decides which path the conversation should follow next.
How does a Condition node work?
It checks data such as a user response or variable value. If the rule is true, the topic follows one path. If the rule is false, it follows another path.
What conditions can I use in Copilot Studio?
Common condition types include equals, not equals, greater than, less than, contains text, is empty, and is not empty.
How is a Condition node different from a Question node?
A Question node collects user input and stores it in a variable. A Condition node evaluates that value and decides what should happen next.
When should I use a Condition node?
Use a Condition node when the conversation needs to branch based on data, business rules, approvals, user type, status, amount, quantity, or missing information.
What is a best practice for Condition nodes?
Keep conditions simple, use clear variable names, test every TRUE and FALSE path, and include a default or fallback path for unexpected cases.
Sources
- Microsoft Learn: Authoring Create Edit Topics, Microsoft
- Microsoft Learn: Microsoft Copilot Studio, Microsoft
Have a Microsoft 365 topic idea?
Share article suggestions, community session ideas, corrections, or real-world scenarios for future nextM365 learning notes.
Keep learning Microsoft 365
Explore more practical tutorials for SharePoint, Power Platform, Copilot Studio, migration, automation, governance, and security.
Continue learning
Related tutorials
Related questions
Related comparisons